Thursday, October 10, 2019

Creative Inspiration in the Garden.

It's been a long time since I’ve posted anything on this blog. However that’s not to say I’ve been idle on the creative front. Creativity, of course, takes on many forms. Sometimes things need to gestate for a while before anything worthwhile is brought to life, at least publicly anyway.

The last fews years I've been giving my attention to cameras and photography, but with a view to creating art. I’m also a keen gardener, so the garden seemed a natural place to find subjects to focus on.

Years ago when I was a printer I was involved in creating a few calendars and one in particular I enjoyed and found to be rather inspirational. It featured the work of a painter who specialises in floral subjects. She’s also a keen gardener like me and she finds much of her subject matter at home. Her name is Nancy Tichborne, a New Zealand water colour artist. Google her name. She has an interesting story to tell and beautiful artwork to go with it.

The good thing about finding subjects at home for me means less time gallivanting round the countryside looking for scenes to shoot, although I do enjoy landscape photography when I do get to explore a bit. But where I live the traffic’s so bad especially at golden hour, I feel I can be more productive staying at home.

So this year I’ve been concentrating on growing the kinds of plants I’d like to create art from. Lillies are one such plant I’d never tried growing before but which I truly love. So when the first lilly bulbs started flowering, the creative instinct in me went into overdrive as I tried various ways of capturing them in an artful way. This is one example of the results...


This will no doubt be the first of many attempts I hope to make when the other bulbs finally flower. 

Monday, February 9, 2015

Creating a Gmail Signature

Ever tried creating a GMail signature and wondered why you couldn’t attach a graphic as a Jpeg or Gif directly from your hard drive like you might expect? The secret is to link to your graphics from a location on the web. The quickest and easiest way I could think of to upload my icons to the web was to create a blog post with them embedded in it, so here they are here...


Now all I have to do is go into my Gmail settings and when creating a signature I add the icons as needed by cutting and pasting the image location into the appropriate text box. 
Go to: Insert image/web address (URL)


The good thing about doing it this way is that you can add a link to each separate icon making your email more interactive. This means when an icon is clicked recipients can then be directed to further information. In my case I added a link to content I have on the web that is relevant to each of the brands I manage, e.g. websites, facebook pages, Google Plus content, online shops, etc.


After that simply add whatever text you need. 
This is what my email signature looks like when finished...


I started off using jpeg format but then found the icons had an annoying gray background, even though the background is set to white. So I decided to try .png format instead which strips the background away... I made them slightly bigger while I was about it...


You could get more adventurous and try a full width graphic footer like this...


Tuesday, August 12, 2014

The Art of Caricature

Following on from my last post about Rodney Pike, I was so inspired by what he’s doing that I thought I’d have a go at creating a caricature of my own. I’m always keen to try something new and I was especially interested to see if I could actually do it.

But, I personally think caricatures only have wide appeal when they depict someone famous and who most people would recognise, otherwise the effect is lost. So perhaps I should try one of our NZ politicians — after all, there is an election coming up.

Anyway, I had a lot of fun creating this. Who knows, perhaps I’ll do more...


*****

Here’s one I did of Tame Iti a well known and recognisable face in New Zealand.
Read the news story that helps to explain this here


Drawing Inspiration from Rodney Pike

Most artists you speak to would all agree that earning a living in the real world from doing what you love as an artist is easier said than done. That’s why the story of Rodney Pike is so inspiring.

Like most people with a creative bent, I like to keep working at my craft, trying new things and just seeing where it leads. I was interested to learn that Rodney Pike takes a similar approach and he’s really creating a name for himself — and quite a following too with 2.5 million followers on Google+ and still climbing.

My recent interest in Rodney Pike started when I posted a piece of digital art in a Google+ Community which apparently caught Rodney’s eye and he reshared it on his Google+ page. Wow! what an honour! (If you ever get to read this Rodney, please know that I really appreciate your vote of confidence. Coming from you that means a lot.)


Interestingly, and as one might expect it’s had more likes and shares on his site than it’ll ever get on mine. Shame the numbers aren’t reflected back on my page, but anyway I’m sure it still provided a huge boost to my visibility on G+. This was the picture he shared, (posted on Google+ Aug 11th)...


The following video is an interview with Rodney Pike where he discusses some of his work, how he got started and also how to get the best out of Google+. It’s definitely worth watching. It’s quite an inspiring story that has helped me to continue believing in myself — something we all need from time to time.

Thanks again Rodney.

Tuesday, July 1, 2014

What Future for Graphics Arts and Artists?

I’m generally not one for making predictions about where the future’s heading, but I’ve been around long enough in the Graphic Arts industry to know that change is inevitable. And with all the changes I’ve seen in the industry since the early ‘80's, and with recent grumblings I've been hearing in the Graphics world I have a pretty good idea where it’s headed.

Let me just summarise some of the changes I’ve seen in the graphic arts industry with prticular reference to the printing side of it.

Paste-up Art
When I first started as a graphic artist back in 1984 a lot of the artwork I created involved the use of a few pieces of very specialised equipment, including typesetting machines and industrial cameras as well as a steady hand and a great deal of craftsmanship. Type specking and sizing of images was a carefully planned activity that often required an approach involving as much mathematical know-how as it did of design.

All of the design elements needed were output onto photographic paper and were 'developed' using expensive photographic chemicals that needed changing weekly. Then you had to 'cut and paste' them using a pair of scissors, wax or glue and a drawing board to create the final artwork. By today’s standard, designing and creating artwork like this was an extremely time consuming and expensive process but it kept a number of people in work.

This in itself was a much quicker process than what preceded it. I served my printing apprenticeship at a time of great change in the printing industry (1980-84) when many printers in my area were 'modernising' from letterpress to offset printing. Prior to this 'paste-up' method of artwork creation, they used lead type and engraved zinc blocks and everything was created in reverse. That method of 'artwork creation' had been used for decades prior to this, and probably hadn't changed much since the days of Gutenburg who invented the art of movable type.

Computerisation
Personal computers back then were no more than a distant fantasy – even when I first started in the industry. It was 1990 before computer technology had progressed far enough to be considered usable in a commercial setting as far as graphic arts were concerned. Up until that time I was spending thousands of dollars a year on typesetting and camera work, the cost of which I would have to pass on to my clients. However, when I bought my first computer (a Mac Plus in 1990) I immediately became more self sufficient and ceased buying in those services. My business became more profitable. Not only was I saving on the cost, the whole process was much quicker too, so it gave me a much needed competitive edge.

It wasn’t long before typesetting businesses started disappearing, followed quickly by film strippers, scanners and industrial camera operators, whose services were notoriously expensive. Now that it could be done on computer with a few key pieces of software like Photoshop and Quark or Pagemaker there was no longer any need for such specialist services, and graphic designers who started computerising their workflow early were the real winners. However that only lasted for a few short years.


The key driving influence of course was profitability. Sadly it always boils down to MONEY. So you can be sure the insatiable quest for it doesn’t end there.

Inevitably, personal computers developed to the point where ANYONE with a computer and a few key pieces of software could do it themselves without a graphic designer. Many graphic designers started going out of business as a result. At around this time the polytech’s and Universities started churning out design graduates, as many hopeful design students were lining up to shell out big bucks to become "Graphic Designers", each of them oblivious to what was happening in the industry.

Interestingly, the Graphic Designer section of the 2008 Auckland Yellow Pages featured some 26 graphic design businesses who could afford a display advertisement costing between $1500–$3000+ a year. By 2012 this number had dropped to zero. The internet has only sped up that process. In the mean time whole sections of the printing industry have become extinct. The frightening thing about all this is how quickly it’s all happened.

Software Giants
Since the whole industry started revolving around computerisation the developers of the software tools we’d been using began flexing their muscles. During the 1990’s Aldus Freehand and Pagemaker were bought out by Adobe and then trashed, making it clear they were intent on eliminating their competition so as to attain market dominance by maximising the use of their own core products. They even gave away Acrobat Reader for free which cleverly created a dependency on their wares.

Before long Adobe rose up to become the leading provider of professional graphic arts software, with it’s flagship product: Photoshop. In the mean time Adobe started marketing its software as a ‘suite of products’ in an attempt to cast its net wider to find new users and as a result flooded the market with its products. All the while it’s traditional customer base — Graphic Designers were struggling to find work and had started disappearing. Many could only afford to upgrade their software every few years. However, Adobe’s arrogance and its quest for profitablity seems to know no bounds.

Adobe has sought to use it’s market dominance to change the rules concerning the use of its products. They are no longer content to SELL their products, and then wait 2 or 3 years for them to be upgraded. Now that they’ve conditioned everyone in the industry to depend on their products to earn a living they’ve sought to force users of their products to RENT them on a monthly or yearly basis on subscription. This could force even more players out of the industry and at the very least will increase costs for all those desperate to stay involved. Many fear that signing up to this new arrangement will expose them to Adobe’s insatiable greed, reasoning that in the future it could steadily increase the subscription fee whenever it felt like it, and the average user of their products be powerless to do anything about it.


What of the Future?
Without doubt we will continue to see a growing chasm between the haves and the have-nots in this world. And while I don’t consider myself to be in either of these groups, I sense that this move by Adobe will force me and many others like me to make a critical decision, whether to COMMIT to the industry or to ABANDON it. It seems it will not be possible to remain only half-in as in the case of many hobbyists who use their products. There’ll be no room for any hangers-on in the long term.

For those already committed to the industry, this could be seen as a good thing. Those looking for a silver lining in this dark cloud might reason that Adobe is actually doing them a service by thinning out the industry, forcing any pretenders to leave, or any cheaters with pirated software to cough up like everybody else and make it a level playing field.

It could take several years for all this to work itself out. But I’m not ready to put my pencils away just yet. What else could I do?


Wednesday, June 18, 2014

Zazzle Design Competition

Regular readers of this blog will have heard me talk about Zazzle. It’s a useful outlet for some of my work where I can sell various souvenir and gift items with my designs on them.

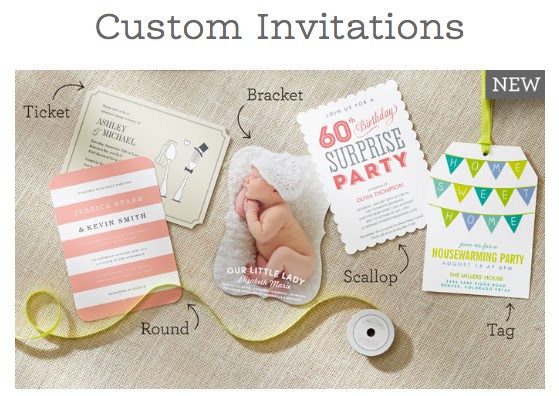
I was recently stirred to action when Zazzle announced a competition to showcase a new range of products they were adding to their site — a range of die-cut invitations.

They were inviting designers to create their best invitation designs which could win them a prize of US$500 plus their designs would be used to promote their invitation products on the Zazzle site. They’re calling it the Show Off Your Skills Design Challenge, and it runs until the end of June.

The range of die cut shapes they’re doing are the Ticket, Bracket, Scallop, tag and rounded cards at a 5x7 inch size.

So, I decided to try putting my new 'painterly effect' to use and see what I could come up with. To begin with I thought about doing a 'Wedding' invitation and a 'Baby Shower Party' invitation, mainly because I know of a few expectant mothers and also engaged couples who are planning their big day. I thought if I had some real people in mind that might enable me to get my mind on the right wavelength for the job.

There wasn’t a lot of time and the weather in NZ lately has been pretty bad so doing a photo shoot from scratch with what I had in mind was going to be out the question, so I opted to use a few stock images – a rose, a teddy bear and an outdoor wedding scene...


This is how I used the images...


Hopefully, I’m in with a chance to win, you never know. “Nothing ventured – nothing gained” right? I would have liked to do more designs as there’s no limit to the number of entries you can submit. I may be able to squeeze more in before the competition ends in about a weeks time.

Anyway, you can see any new designs I add by visiting my Zazzle invitation page here

Wednesday, May 28, 2014

Having Fun with Post Processing

I’ve learned a lot about photography in recent months and while I’ve enjoyed the challenge of capturing  images in camera, it’s the post processing of the images that I’ve been having real fun with. That’s the part of the process that for me is where the real creativity begins.

Let’s face it I’m a graphic designer/commercial artist at heart. And with all the software tools available these days the whole process of creating illustrative artwork digitally has become that much easier — and quicker too! A couple of months ago when I exhibited some of my photographic work I was flattered to hear 1 or 2 commenting on how they weren’t sure if what they were looking at was a photo or a painting. They seemed to like the fact that it looked like a painting.

Well, I like that sort of thing too, which is why I did it that way. However it’s not until you look closely at the work I've done so far, that the question even arises. Here’s a blown up section of a recent piece I’ve been working on.


It started off as a photo which was taken in the Auckland Wintergardens. The circle in the picture below shows the section that is shown in the enlargement above. To all intents and purposes, the picture shown at the current size below just appears to be an ordinary photograph. It’s only when you look closely that it appears like the picture above.


I’m really excited about the potential for this style of work. I realise of course that it’s not everybody’s cup of tea. There are the purists who think that photography should remain just that and that it shouldn’t pretend to be something else.

But these days it seems anything goes. We’re now only limited by our imagination.


Wednesday, May 7, 2014

The question of POST PROCESSING photos

With all the technology and software available today there are a myriad of choices to make regarding how to process your images. Some of the questions that arise are: 
What am I trying to accomplish? 
What should influence the choice of styling? 
How much is too much? And where do you start?

For me it all starts with the image itself. I try to ask myself...
What is the overall mood of the photograph? 
What are the most compelling features of the image? 
What is the best way to draw attention to those features? and 
What kind of response am I trying to elicit from the viewer? 

Some of the above questions can be hard to answer due to the subjective nature of visual arts. So, at the end of the day I have to trust my own instincts and produce what I think works best. (This of course, is assuming you're not shooting on commission for somebody, who's personal taste will often dictate the final style).

There are times when I can be a little indecisive about this, or I can go back to an image a day or 2 later and decide that I don't really like the style I've applied to an image or the way I've processed it. Take this image for example:


My initial instinct was to process this image as I did in pic.2. I must admit I was rushing the decision a bit, in an effort to share it with friends as soon as possible following a recent event. I knew it was a great shot but on reflection I decided I hadn't carefully thought through the best way of processing it. 

It turns out that I'm not the only one who likes the image. Most of the feedback I got was very positive and revolved around the central figure in the picture where all eyes are focussed. She's a beautiful woman and my initial attempt at processing the image didn't address this aspect of the shot. I was more focussed on the fun that was taking place (it was a game of musical chairs).

As I mentioned above, this can be very subjective, everybody sees something different. So I'm interested to know what you think. Please feel free to make a comment.

Thursday, May 1, 2014

More on Selling Canvas

Following on from my last post about 'being seen in the right place', one of the marketing avenues I’ve thought about for my photography is to take the plunge and start producing my own framed canvases and try selling them direct to the public. This is not a new idea of course, but I'm guessing there are a number of pros and cons associated with this method of selling.


Not that I’m a negative person, but the first thing that comes to mind is the RISK. Compared to online selling where canvases are printed to order from a huge catalogue of pieces, this way of selling requires the artist to risk printing out something that someone may never buy. There’s a lot of money’s worth of time and materials tied up in stock just waiting for a chance sale, which probably explains why in the picture above they’re being sold ‘unframed’.

This factor makes it imperative that you know what the market wants in order to minimise the risk, which sounds like it would require more in the way of ‘crystal ball gazing’ than meaningful research, as people’s tastes in art can be very fickle and hard to explain or even understand.

I mentioned there are pros. In the event that you do get ‘lucky’ and let's face it, that’s what it boils down to in the end, there is a much larger profit margin on each sale as well as an opportunity to meet those who love your work face to face. I’ve been told that art buyers like to know whose work they’re buying. It’s not uncommon for such art buyers to buy more than one piece. The important thing is getting your artwork in front of real people.

I put this to the test recently. After selecting 3 pieces to sell I duly set about printing them out on canvas on my Epson printer, which does a brilliant job but I’m limited to a width of 17inches.


Each print got a Museum Grade coating of matt varnish before stretching onto frames.


Then I entered them into a local gallery exhibition with high hopes of making a sale. Unfortunately they were exhibited alongside 150 other pieces, many of which were much larger in size. I must admit that once I saw how they were presented, I wasn’t too hopeful about making a sale and sadly I was right.

For now I’ve resorted to loaning them to friends to hang on their walls seeing as all my walls are full. But I have a few more ideas up my sleeve about what to do next. I’ll do another post about that later.

Saturday, April 5, 2014

Being Seen in the Right Place

When I first started getting into photography, a very important thing I needed to figure out was what to do with my images once I had some that I thought were worth sharing.

Besides the 2 main social networks Facebook and Google+ which have their uses, there are many other options to choose from, and at first it's hard to know which one's the right one. If you've read any of my other blog posts here, then you would've heard me talk about Zazzle which is where I sell all my t-shirt designs and other souvenirs. At first I just automatically tried selling my photography as framed art prints on Zazzle, but I wasn't particularly happy with how it worked or the pricing.


So I started looking around at other options. There are many more besides the 4 I've shown on the right in the above picture. But these are the 4 I have experience with so far. So I thought I would share my observations about each of these forums for selling photography, as they all have something different to offer.

My guess is that unless somebody's into photography or artwork they probably wouldn't have heard of these web sites. When I first started getting serious about photography the only one I'd heard of was Flickr, but even then I didn't really know what it was or how it worked.

So I started with Flickr, only because I'd heard of it...


Flickr's very easy to set up and use. The best part is it's FREE and it took me no time at all to upload some of my pictures so there was at least somewhere online where all my work could be viewed. You can sort your images into sets and it's a handy place to store and present your images.
However Flickr didn't seem to be designed for the purpose of selling images as artworks like I wanted to do. Also every photographer's page is layed out exactly the same, so there's little scope for personalisation, (which I must admit didn't bother me too much, so long as it worked).

That's when I heard about SmugMug...


SmugMug gives users the ability to virtually create their own unique photography website. It's very professionally designed with some nice animated transitions and other cool graphical features like slideshows, etc. Plus it has a whole shopping cart system that's geared toward sales of photos with a number of different products available including stretched canvas, framed prints, and so on.

It take's a bit longer to get your head around in order to customise it the way you want it, which can be quite time consuming, plus there's a cost attached – it's costing me $20 month.

Following this, I stumbled across FineArtDownunder...


But don't be fooled. It's actually FineArtAmerica by another name. The first thing I noticed was that the layout wasn't that flash. It looks very dated and ordinary. However it has some useful features that make it a very worthwhile tool to use. Firstly, each time you upload an image you are prompted to assign tags to your photo which enables the site to work well from an SEO point of view (Search Engine Optimisation).

Interestingly, if you Google 'photography on canvas', or words to that effect their site comes up consistently on page 1. Then the search feature makes good use of the tags it prompted you for, enabling art buyers to find your stuff. If they're interested in purchasing a pic and click on it they're taken to a page with a magnifying glass feature that enables a closer inspection, almost at pixel level. The site also allows you to set your own pricing margins. And a really great feature that's not available with any of the others is how it integrates with facebook. Each time I upload a photo it automatically updates my online shop within Facebook. The best part is it's FREE to use.

Just out of curiosity there was one more I wanted to try and that was 500px...


This site totally blew my mind. If I had to can sum it up in 1 word it would be AWESOME!
This site has been very cleverly designed. They've obviously thought of everything (except the Facebook thing). From the moment I started uploading pictures I started getting feedback from other users liking my pictures and saving to their 'favourites'. Each 'like' and 'favourite' you receive adds to a ranking – a rating out of 100%. The nearer to 100% you go the more visible your work becomes.

Having said that one of my images got up to 94% which I was pretty pleased about, but it was still a loooong waaaay from the top of the list which shows how many great images are on the site. There's some really excellent work on there. I saw more work and got more feedback from other fellow photographers in the first hour than I've received so far from all the other sites combined! Now that's saying something. The feedback was instantaneous. At first I couldn't figure out how everyone was seeing my stuff. When I finally figured out how, that's what led me to conclude that it was so well designed.

The way this site is designed encourages a striving for excellence that the other sites don't seem to do so well. Plus it has all the other features that allow for selling a variety of products, although they set a standard profit margin for all photographers which seems a bit odd. Plus it's not FREE. I'm still on a 14 day trial, so I've yet to go through the process of deciding whether to keep it or swap it for Smugmug because I can't afford both.

So, there you have it. I hope this summary has been helpful. Please feel free to share your observations or comments if you've used any of these services.

Why not take a look for yourself using the links below:
Zazzle
Flickr
SmugMug
FineArtDownunder
500px


Thursday, April 3, 2014

It's been a while...

It's been a while since I wrote anything here. I haven't been doing much blogging lately. I've been a bit pre-occupied with various other things.

One of my biggest difficulties is that I have so many different interests that I can't seem to do them all justice. In recent times I've been focussing on getting up to speed with a few of the main social networking tools like Facebook and Google+. Until recently I had very little understanding of how to use them properly and what their benefits were. My main aim was to grow my audience and get a bit of visibility for some of the things that I'm doing. This is very important when it comes to marketing one's self, no matter what endeavour you're involved in.

However, the difference between social networking and blogging have become quite apparent to me. In the social networking environment people seem to be in a hurry to do everything and it seems to be all about gaining "likes" and "pluses". You're basically in a situation where you're effectively competing for visibility. It's dependant on visual stimuli and I'm often left thinking how superficial the whole experience is. Neither of these tools seem to encourage meaningful dialogue or interaction between the people that use them.

Having said that, I have managed to attract a small audience of around 100 on Google+ and a combined audience of about 140 or so between the 3 facebook pages I'm running which is not a lot by any means.

But at least blogging allows for an exchange of ideas at a deeper level. You can get into the 'meat' of a matter and drill down into stuff that's of real interest. This is the kind of tool that allows for a real 'meeting of the minds' for those who need it.

So having said that, I'll be back here again soon to share more of what I've been up to — at least in the creative area.

So y'all come back now, you hear?

Friday, September 20, 2013

“Ye Auld Mug” T-Shirt

New Zealand has been abuzz with America’s Cup fever this week as we inch closer to what every New Zealander hopes will be the second time we successfully challenge for the cup.

So to get in the spirit of things I decided to create a souvenir t-shirt for all those supporters either at home or abroad who want to remember this awesome event in their own special way.


I have designed it so that the text can be customised creating a unique one-of-a-kind souvenir that allows you to put your own personal stamp on the experience. While the default text reads “OFFICIAL NEW ZEALAND SUPPORTER” this can be customised to read whatever you want it to say

It seems everybody has a comment to make on the subject and now you can too with your own “Ye Auld Mug” souvenir t-shirt.

Get yours today by clicking here 

Wednesday, September 4, 2013

Historic Taverns Inspire New Ideas for Artworks

One subject that seems to lend itself quite well to HDR photography is historic architecture. There are several historic buildings I’ve seen on my travels, that whenever I pass them I think about how I’d love to capture them in all their glory and turn them into a work of art for others to enjoy... like the Paeroa Hotel for example which I passed on the road on a nice sunny day recently.


These old buildings are a reminder of a by-gone era. Perhaps that’s why, for me they ellicit such emotion when I see them. I’ve applied a subtle painterly texture to this photo which may only be properly appreciated when viewed at full size on a stretched canvas print.


Click here if you’d like to purchase a Paeroa Hotel Stretched Canvas Print.


*****

While I was about it, I decided to try again to capture the Northcote Tavern, another historic building in my local area. But this time I wanted to see how it might look being turned into a badge or graphic with a bit of typography added.


If you’ve read much on this blog you will know how I can’t help myself doing this. All those years spent doing Graphic Design for labels and logos probably. But who knows, perhaps others will share my love of these old buildings and be tempted to wear a souvenir t-shirt with their image on them.


Click here if you want to purchase a Northcote Tavern T-shirt 

I’m happy to do commissions too if you have something particular in mind. Feel free to leave a comment below.

Thursday, August 29, 2013

HDR Photography

Anyone reading this blog will probably know by now that I’m always keen to try something new when it comes to being creative and photography has been no different.

But anyone with a camera (or even a phone these days) can take semi-decent photos, right? So, I want to take photos with a bit of “Wow” factor.

For me, when I first started looking closely at other people’s photography it was HDR photography that always seemed to get my attention. So I decided to try understanding what this is and how to do it.

Here’s a couple of examples taken one rainy morning recently...

I think the trick is knowing what kind of subject matter suits this kind of photography. This technique doesn’t seem to work so well on everything. Of course there’s a lot of trial and error involved too.

One photographer doing a lot of HDR stuff and who’s amassed a huge online following these days is Trey Radcliffe. He puts a lot of his stuff up on Google+. Just Google his name and you’ll easily find him. He also has a blog called “Stuck In Customs”which is well worth a read. I only started noticing him since he moved to New Zealand which is where I live.

The above photos were taken only minutes from where I live, but now that I’ve figured out how to do this, I’m keen to travel further and find some new and interesting subjects to shoot. 
These are both handheld so they’re lacking a bit of sharpness — I can probably fix that by using a tripod.


Tuesday, August 6, 2013

Another Painting

Muriwai Beach – Painting


I love Muriwai beach. It’s such a rugged place. It’s one of Auckland’s famous west coast beaches. Places like this are just begging to be captured on canvas so I’m pleased to be able to make this print available for sale on SmugMug. 

SmugMug is a great place to buy and sell photography and other creative artworks. They have a good range of products including framed, mounted or stretched canvas prints. 

Thursday, July 25, 2013

Turning Photography into Framed Works of Art

When it comes to producing works of art and particularly paintings on canvas, I’m a bit impatient. And yet I’m constantly having new ideas about what kind of paintings I’d like to produce. That’s where photography can aid the whole process by speeding it up.

 Take for example the photo that I spoke about in my last post. These days with modern technology it’s a pretty simple process turning such photos into beautiful paintings by applying painterly effects and textures to the image on the computer and then printing them off onto stretched canvas.
I’ve been planning to make such paintings available for sale. If you’re interested in purchasing one visit my online store and order one today. Click here

Tuesday, July 23, 2013

Getting the Hang of Photography

I’ve been taking photos for as long as I can remember. My brother and I were each given a blue plastic Hanimex camera when we were about 7 or 8 years old, back in the early 70’s. I seem to recall mine eventually melted in the sun one day when I left it in my dad's car on a hot summers day. My brother never used his, so at least I was given a second chance.

I was never really shown how to take a proper photo but have always had an interest in it. But it’s only in recent times, since I got myself a digital SLR camera that I decided to get serious about taking good photos.

Having spent most of my life following various other creative pursuits, the ‘art’ of taking a good photo feels a lot more intuitive than it was when I was young. But having said that, there are still a lot of technical things I still need to understand, but I’m getting there.

It took me the first 1200 shots on my new Nikon D7000 to figure out how to do this...


Essentially it’s the result of a whole variety of different factors, some technical, some artistic. One thing I’ve discovered is that something as seemingly simple as ‘patience’ can make the difference between a shot that is either mediocre or outstanding. Especially when you’re relying on certain elements that are outside your control, like the weather and capturing a scene in the best light.

I’ve decided to show off some of my photos on Flickr under my new D-Mac NZ brand.


See more shots on my Flickr page here.


Wednesday, March 27, 2013

Reviving Black & White

I have produced hundreds of pieces of artwork over the years, some of which has never seen the light of day or it’s potential was never fully realised at the time. So I decided to try recycling some of it and give it a new twist.

I did a lot of designs using black and white back in the late 80’s and then again in the late 90’s. I’ve noticed how Black and white as a fashion statement comes and goes, so perhaps these cushion and pillow designs will appeal to those who love the NZ outdoors and want to go with a black and white theme. They feature some of the Flora and fauna that makes New Zealand so special.


I thought while I was about it a messenger bag might look pretty cool with the same design on it, but in this case with a subtle accent of colour.

There’s something about the use of fabrics that really appeals to me. It’s an avenue I haven’t explored fully. Perhaps I should do so.

If you want any of these items you can purchase them by following these links:


Wednesday, January 23, 2013

Handyman Signage

As far as advertising goes, Vehicle Signage is a very cost effective way of getting your message out there. When Stu a north shore handyman called me I was happy to help him out. He had a few ideas of his own. He just needed help putting it all together.

Firstly he needed a logo. He had the idea of a kind of Super-Handy-man character. So I created this first, complete with his initials and the word HANDYMAN featured prominently on it.


Then he wanted to use a photo he’d taken of his wife and overlay it onto a large 'TO DO' list. This is because he’s found a lot of his best customers are women, who often have a whole list of things they need done.

So this was the initial concept I did for the side of his truck which included some additional graphics /striping to tie it all together. An important factor to keep in mind were the sliding door panels. The position of the graphics with these in mind was going to be quite important.


Stu also wanted to have some tools shown on the van somewhere. He’s got a tool for every job you can think of and he wanted this to be obvious. So I managed to find a really cool graphic in a stock photo library which I adapted by incorporating his initials and the Handyman wording...


Stu gets noticed everywhere. Often when he’s parked at the supermarket he’ll get people coming up to him asking him for a business card, so he’s got a bit of work off it already.

I got him to do a job round my place recently trimming trees. He did an excellent job.
If you’re on Auckland’s north shore and need a handyman, Call Stu. Tell him I sent you.

This is how his truck looked when it was finished.